Tuesday, February 27, 2018

Topography/Surface, Texture, and Value

Objects, when viewed closely, have changes in the topographical shifts over their surface which can be either subtle or pronounced. The light that hits the surface of an object produces a pronounced contrast between light/shadow due to the surface topography, and that effect can be enhanced or subdued depending on the light source and intensity. 

When viewed from a distance, this play of light and shadow is interpreted as "texture" - it creates for us a surface that can be understood to be felt and affect a particular sensation of rough, smooth, spiky, soft, wet, sticky, gritty, sharp, etc. 

When viewed up close, we can visible see those formal shifts in the surface, the surface topography, that catches light and casts shadows - the dips, the ridges, the grain or polish. 

Think of a city: When viewed from a birds eye, the surface of the Earth is affected with the "texture" of buildings, roads, rivers, etc. When you are within the city itself, those "textures" are realized as the larger-than-self objects, themselves with surfaces that contain texture and topography. 

If you were the size of an ant, or a gnat, how would surfaces that we humans see as merely "texture" appear to you? Would the be larger-than-self? Would they become landscape?

Try to view an object closely, with a strong influencing light source, to notice these "landscapes" made of form, depth, light, and shadow. Think of the surface topography, as we would with a cross-contour drawing of surface. 

Using only shapes of light and dark, no line, construct a drawing that demonstrates a sense of the surface as space with all the considerations that you would make of an object still-life. Consider proportions and relationships, depth of space/field, scale and contrast of scale, light/dark, etc. 

------------------------
Examples of enlarged surface drawings from the web:


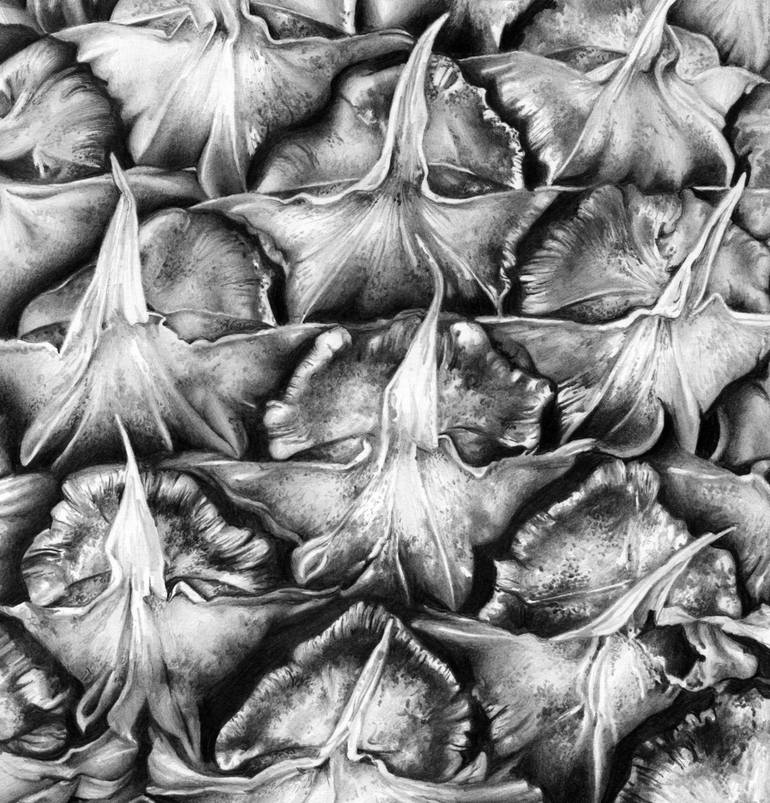
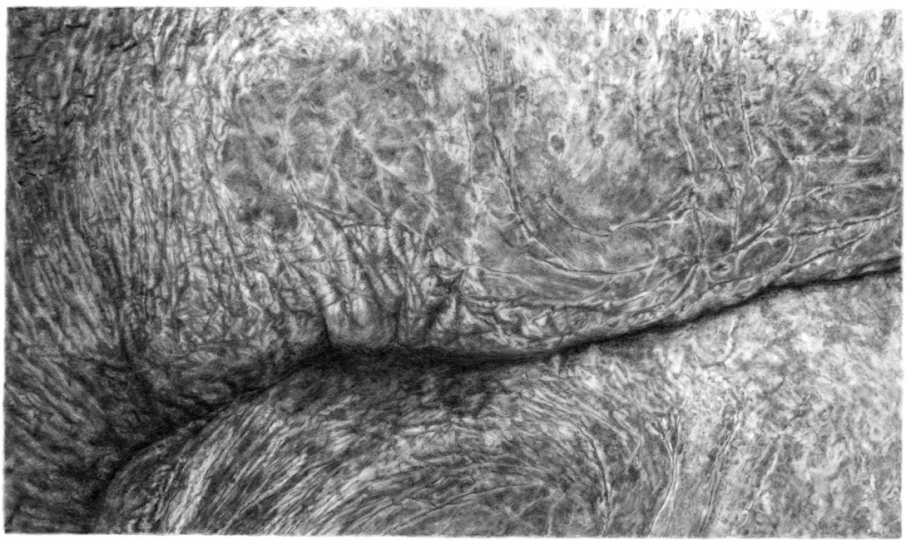
NOTE The consideration for the various subtleties that can exist within a closely observed surface - the shapes and range of value, shifts in contrast and depth of space. Consider the light, consider the form, consider the surface of the object as an object within space


Consider how topography is typically understood, and compare:


WE ARE DOING THE SAME THING

At a much smaller scale

Thursday, February 8, 2018

Vanishing Point, Perspective, and Foreshortening

The Vanishing point of a drawing in Perspective exists on the Horizon Line

The first step to creating a Horizon Line is to understand where your eye-level is, parallel to the ground.
  • This can be done by pointing straight outward and raising your hand to the point at which your hand touches the center of your vision when your head is held straight and eyes forward.

Note the point at which the vehicles and the road does or does not pass the eye-level in this photo.

Extending the eye level as a line, through space, as objects (or people) recede within it.
You can note that even the distant figures align with the viewer's eye-level. 
  • Despite the distance, the objects do not grow or shrink in size
  • Therefore it is reasonable to assume that something which is at your own eye-level near to you will also sit on the eye-level (therein Horizon Line) at a distance as well.
Image result for how to create a 1-point perspective drawing

In this example, the eye level is where? Indicate it as you observe it, think about where it might be in this image!

This is a 1-point perspective hallway. 
Note how the wall nearest to the observer is a flat, horizontal line. 

A 1-POINT PERSPECTIVE has only ONE (1), SINGLE, VANISHING POINT

Now try to indicate where on this image the Vanishing Point exists, as it rest ON the Horizon Line


When the observer's viewpoint is raised or lowered, the horizon line (as an indication of observer's position in space) will likewise raise or lower. 


Refer to earlier posts to see the variety of perspectives and vanishing points that can exist.