Hi all, the drawing you are all working on deals with perspective - in particular, an
exaggerated perspective. This means to deal with objects, within a composition of our view, that apply perspective in a way that objects might appear larger or smaller than they are, relative to one another, based upon the relative position
you as the viewer place them.
Meaning, if you have 3 buildings of equal height, you will place yourself in a position where those 3 building seem to be of different scale, though that is simply to be seen as a trick of perspective.
Imagine a road with telephone wires that seem to grow smaller toward the distance and larger as they approach you.
Also, we have "
binocular vision, which is the basis for stereopsis and is important for depth perception, covers 114 degrees (horizontally) of the visual field in humans; the remaining peripheral 60–70 degrees have no binocular vision (because only one eye can see those parts of the visual field)."
(ripped straight from Wikipedia, don't do this for papers in other classes! Bad.)
So we have a very limited field of view that is function for us to perceive, directly in front of us. Our mind also orients things in a way that makes it easier for us to navigate, making some lines of perspective straightened, others less exaggerated.
Dont forget, also, if the connected points of a shape are not parallel, they will not vanish to the same vanishing point on the horizon line!
_________________________________________________________________________
Source I found that words very well the differences between the types of perspective:
1 point:
"One point perspective takes one of the three sets of parallel lines of the cube and projects them to a point, a VANISHING POINT. We will say this is the North direction. The other two sets of lines of the cube continue to run parallel and unaltered. This vanishing point can also be considered where your eye is located in relation to objects found on this page. This location of the eye or (vanishing point) becomes the place where cubes shift across in space to show their opposite side, from right to left and from above you to below you."
2 point:
"Two point perspective uses two of these three sets of parallel lines of the cube. It projects one set of parallel lines to the North point and the second set of parallel lines to the East vanishing point. In two point perspective, the third set of lines continues to run parallel. In this case, they run straight up and down. Notice the two points we are using, North and East, are 90 degrees of our horizon. This HORIZON LINE is also the EYE LEVEL LINE. The eye is better to use because if you are underground or in outer space there is no such thing as a horizon but there is always a location of your eyes (eye level)."
 3 point:
"Three point perspective uses all three sets of parallel lines of the cube. Similar to two point perspective, one of the sets of parallel lines aims toward the North point and the other set aims toward the East point. The third set of lines projects toward the Nadir point (below you) or the Zenith point (above you). Either Zenith or Nadir can be used with the same grid by spinning the three point perspective grid 180 degrees. You can project all of these lines with a straight edge."
4 point:
"The four point perspective system can be thought of in a couple of
different ways. First, we use the same logic it takes to get to three
point perspective. But if the cube we are looking at is very tall and
projects above you and also goes below your eye level, these up and
down lines must project toward two points. Not only does the cube
look fat in the middle, it also seems to get smaller as it goes above
and below your eye level. These lines, which used to be the up and
down parallel lines of the cube, are now curving in like a football
coming together at the Zenith and Nadir points. If you were on the
twentieth floor of a skyscraper, looking out the window at another
skyscraper, forty stories high, you would see this type of effect. A
second type of four point perspective is what is called the
continuous four point perspective system. This system keeps the
Zenith and Nadir lines of the cube actually parallel, and curves the
North to South and East to West lines of the cube"

5 point:
The reason we don't see this with our eyes, naturally, is because we have a narrow field of vision that combines both eyes of our binocular sight - if we could see everything clearly including our peripheral vision, this is what we might see. We use an interpretive view of the world
"This system of perspective, using five points, creates a circle on a piece of paper or canvas. You now can illustrate 180 degrees of visual space around you. It captures everything from North to South and from Nadir to Zenith. Think of yourself inside a really exciting visual environment like St. Peter’s Basilica in Rome. You bring a transparent hemisphere with you. When you find a spot in the Basilica where any direction you look is visually exciting, you put the hemisphere in front of your face and copy what you see on the inside of it. The hemisphere shows five vanishing points, north, on the left, east in the middle and south on the right. There is also a point above your head and another below your chin. One hundred and eighty degrees of the total environment can be drawn in this hemisphere. Think of how this would look on the flat surface. You would have to rely on five point grid system on the flat page to do the same thing, but it really will work. "
___________________________________________________________________
Examples of the types of perspective:
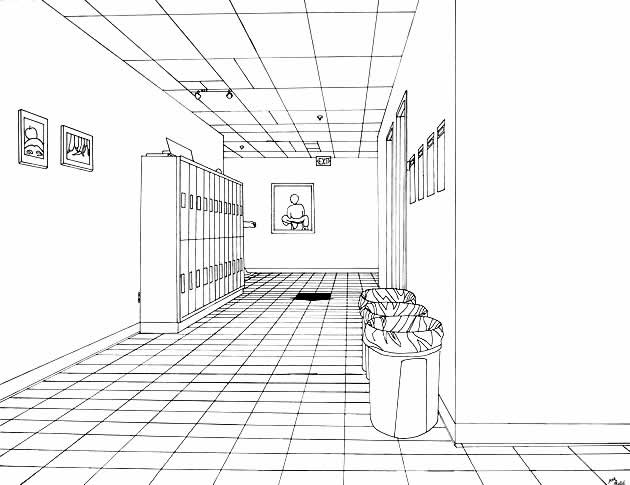
2 point perspective
Note the points of convergence on the horizon
3 point perspective
Now, we deal with not only the receding space from our perspective to either end of our horizon, but also to the zenith (up, above our head) and nadir (below our chin), far below the Earth, if we're standing on it.
4 point:
We would see this view in a photo, or in a complete 180-degree field of view, if we were placed in the middle of a building or scene that extended both above and below our horizon line, for example, if we were floating in front of the middle floor of a skyscraper and had an exceptionally wide field-of-vision.
5 point perspective
The most accurate measurement of 180-degree, complete visual capture. If we could look left, right, up, and down in front of a series of floating cubes, this is how the world would appear.